
In Apple Business Manager (ABM)
The devices should already be in ABM - this should happen immediately via the supplier.
If a device is not in ABM, either request the supplier to allocate it to Scantek on their end or add it in using the App Configurator installed on one of the spare iPads (talk to CS Team Lead).
By default, the new devices are automatically allocated to the 'Venue Entry Inventory' device management service. This means that when the list of iPads is synced to JAMF, the iPads will be assigned the VE profiles, and named accordingly, e.g., SCTK_VE_NL_
If the device was not automatically allocated to a service, you can manually change the Device Management Service. To do so,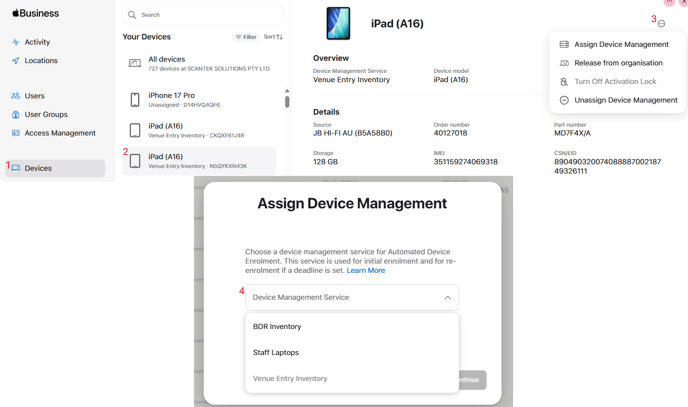
-
- Go to Devices (1)
- Select the iPad (2)
- From the … dropdown, select Assign Device Management (3)
- From the dropdown select the preferred service for that device (4).
TIP
ABM allows reallocation of multiple devices. Hold down the 'ctrl' button and select the devices, then select 'Assign'.
In JAMF PRO
The iPads should sync automatically, to check:
- Go to Settings
- Select Global from the menu
- Select Automated device enrolment and refer to the LAST SYNC column.
- Select the enrolment profile to which the devices were added in ABM. E.g., Venue Entry (Inventory) - Jamf Pro
- Click on the 'Devices' tab and search for the device(s).
TIP
Click Device Assigned column to quickly filter for recently assigned devices.
On the iPad
Power on and connect the iPad to the Wi-Fi (SCTKGuest); it should automatically connect to ABM and JAMF.
In a few minutes, you'll see the Scantek logo in the background and 'INVENTORY' written in red, indicating the device is ready to be setup for a venue.
IMPORTANT
Scan the eSIM before you change the department in JAMF.
Alternatively, below are some quick steps to enrol/setup the iPad manually:
NOTE
You will need an iPad that is already in ABM and JAMF (we'll call this iPad A).
- Power on the new iPad (we'll call this iPad B).
- Wait for iPad B to detect iPad A.
- On iPad A, a pop-up will appear. Choose to setup the new device.
- iPad B will display a blue QR code, scan it with iPad A.
- Follow the onscreen instructions and give it a few seconds to complete the setup and enrolment.
The new iPad should now be in JAMF. To check,
- In JAMF, go to Devices
- Click Search Inventory
- Select All iPads
- Click View
- Search for the new iPad. The Department should be set to Unassigned Inventory.
Refer to section 3 of article [Internal] Venue Entry Classic - iPad Configuration for setting up the iPad for a venue.